반응형
Yocto Project에서 빌드된 결과물을 비글본 블랙 보드에 이미지를 넣는 방법에 대해서 설명한다. 이 방법은 Yocto Project의 Reference Platform인 Poky, http://git.yoctoproject.org/cgit/cgit.cgi/poky를 받으면 README.hardware, http://git.yoctoproject.org/cgit/cgit.cgi/poky/tree/README.hardware에 자세히 나와 있다.
기본적으로 beaglebone은 Yocto Project의 Reference 보드 중에 하나이다. 빌드할 때 local.conf의 MACHINE을 beaglebone으로 변경하고 빌드하면 beaglebone 이미지가 나온다.
아래는 README.hardware 파일 중 Beaglebone 부분이다. 이전에 SD 카드 포맷이 필요할 수도 있지만 일단 여기까지만 설명한다. 포맷은 fdisk 명령어로 boot영역(약 32M)과 rootfs 영역을 해 주면 된다.
1. Partition and format an SD card:
    # fdisk -lu /dev/mmcblk0
    Disk /dev/mmcblk0: 3951 MB, 3951034368 bytes
    255 heads, 63 sectors/track, 480 cylinders, total 7716864 sectors
    Units = sectors of 1 * 512 = 512 bytes
        Device Boot   Start     End   Blocks Id System
    /dev/mmcblk0p1  *     63   144584    72261  c Win95 FAT32 (LBA)
    /dev/mmcblk0p2     144585   465884   160650 83 Linux
    # mkfs.vfat -F 16 -n "boot" /dev/mmcblk0p1
    # mke2fs -j -L "root" /dev/mmcblk0p2
  The following assumes the SD card partitions 1 and 2 are mounted at
  /media/boot and /media/root respectively. Removing the card and reinserting
  it will do just that on most modern Linux desktop environments.
  The files referenced below are made available after the build in
  build/tmp/deploy/images.
  2. Install the boot loaders
    # cp MLO-beaglebone /media/boot/MLO
    # cp u-boot-beaglebone.img /media/boot/u-boot.img
  3. Install the root filesystem
    # tar x -C /media/root -f core-image-$IMAGE_TYPE-beaglebone.tar.bz2
  4. If using core-image-base or core-image-sato images, the SD card is ready
    and rootfs already contains the kernel, modules and device tree (DTB)
    files necessary to be booted with U-boot's default configuration, so
    skip directly to step 8.
    For core-image-minimal, proceed through next steps.
  5. If using core-image-minimal rootfs, install the modules
    # tar x -C /media/root -f modules-beaglebone.tgz
  6. If using core-image-minimal rootfs, install the kernel uImage into /boot
    directory of rootfs
    # cp uImage-beaglebone.bin /media/root/boot/uImage
  7. If using core-image-minimal rootfs, also install device tree (DTB) files
    into /boot directory of rootfs
    # cp uImage-am335x-bone.dtb /media/root/boot/am335x-bone.dtb
    # cp uImage-am335x-boneblack.dtb /media/root/boot/am335x-boneblack.dtb
  8. Unmount the SD partitions, insert the SD card into the Beaglebone, and
    boot the Beaglebone
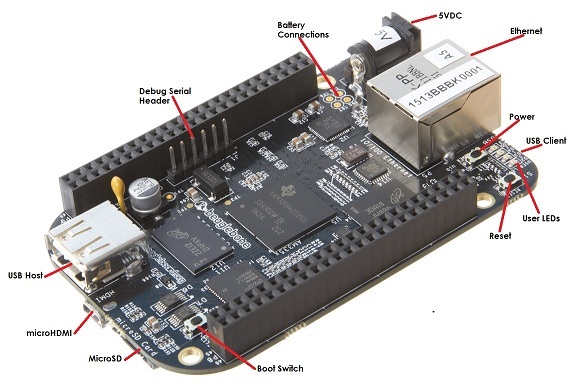
여기서는 SD 카드에 이미지를 넣고 부팅하는 방법에 대해서 알아본다. beaglebone은 emmc에 넣을 수도 있고, SD 카드에 넣고 부팅할 수도 있다. 기본은 emmc 부팅이고 SD 카드를 넣고 부팅 하기 위해서는 다음 그림에서 보이는 보드의 Boot Switch 버튼을 누르고 전원을 인가해야 한다. 또는 emmc의 데이터를 지우면 되지만 부팅할 때마다 Boot Switch를 눌러도 괜찮은 듯 하다.
Reference
728x90
반응형
'Yocto' 카테고리의 다른 글
| Yocto Project, OpenEmbedded를 지원하는 개발 보드 (0) | 2023.04.19 |
|---|---|
| Cross-Development Toolchain Generation in Yocto Project (OE) (0) | 2023.04.19 |
| Yocto Project Developer Day EU 2015 (0) | 2023.04.18 |
| OpenEmbedded(OE)에 contribution 하는 방법 (0) | 2023.04.18 |
| OpenEmbedded (OE) 에서 지원하는 BSP (0) | 2023.04.18 |